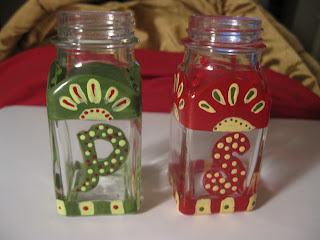
I'm going to show you how to turn these $2 (set) salt and pepper shakers into expensive ones without being an artist. Like the ones below or you can make up your own pattern with simply polka dots or to match something you may want them matched with.
Pics and tutorial after the jump...
I use Folk Art Enamels that you bake in your oven for 30min. You will need the colors of your choice and a very soft brush. They are on the cheap side of brushes and it doesn't matter what brand, as long as they are really soft...like a makeup brush soft. I prefer flat brushes as opposed to round. They do a better job of not streaking your paint. The one I used for this project is 1/4" wide. Start by cleaning your shakers with Windex or alcohol. I use a foam plate and that's all I ever use. You can use a sheet of foil if you don't have any foam plates.
I started with an arch across the top on all sides, no need to get all upset if they are not identical. As long as they are about even on the bottom is fine. You could do just a line without the arch if you would like that better. Next, I did a one row checkerboard in 2 different colors around the bottoms. Just take a flat brush and make one stroke the size you want it. Stroking downward toward bottom of shaker works best. Do that all the way around, skipping a space in between, for the other color(above pic). Repeat this step in the negative spaces (below pic). You could just do a solid line if you prefer.
Don't get all bent out of shape if it doesn't look perfect. It looks better this way. Trust me!
Then I just put some little oval shaped globs and a half circle inside the arch and painted a S&P. Again don't make it perfect. You can see on mine that it's a little ragged lookin' on the ends...We will fix that later.
Next I put some contrasting colors inside the globs. You can do dots and simple lines. Put some dots inside your S&P and some on the checkerboard row. You can do the S&P on all 4 sides or just the front, as I did. At this point you are done with the paint. You will probably look at it and so YUK! That's OK. The only thing you want to fix is a run, just use a q-tip or corner of paper towel. Let them dry an hour or so, the paint should not feel tacky at all. Put them in your cold oven and set the temp to 350* and bake for 30 minutes, when the temp gets to 350*. Leave them in your oven to cool down. If you are impatient, crack the door and that will let them cool down faster.
When they are completely cool...completely!...Get a fat Sharpie and make your Yuk come to life. Don't hold the Sharpie tight and try to be slow and perfect. Hold it loosely and just do a loose trace around all the patterns you created. Inside the lines a bit or outside a bit, makes it look better, so don't wig out! This will cover up any misgivings you had about it not looking perfect and will make the colors Pop and give it that hand painted look you were trying to achieve. You could use paint to outline all of it, but the Sharpie works better, looks better and is a lot faster. I use sharpies for all my outlining unless it's a really expensive piece and I think that deserves true outline. It's something you have to strive to learn.You can outline solid lines or do dots and dashes or just dots. What ever YOU like is what makes it YOUR art. Around the bottom I only made a line between the 2 colors and around the top of the arch I did dashes. It's fun to just play around with your outlining.
I use to try to paint PERFECT and then I worked in a children's store where we painted all kinds of stuff for kids. The girl that I worked with had the most God given talent for art that I've ever seen and she is the one that taught me perfect only exists in your mind and if you strive for only that, you will never be happy. Another artist that was awesome as well and had a degree in art used this saying, "I am not a machine." That quote from her I will never live without. You want hand painted...not perfect or machine done.
I hope you will give this a try and if it's something you don't think you can live with...they were only $2. With glass paint the only problem I have had is soaking the finished project in water. Just give it a quick wash and it's very durable. NO glass paint can give you a "fired on" protection, like in a kiln, but this is very good and so far, the best I have used. I've been using it for several yrs...since it came on the market.
Peace&Love,
CarolAnn


What a neat and simple way to have matching S&P shakers for any color or style of kitchen. These would make great housewarming gifts!
ReplyDelete